Camera Holster Project
I don't have any good photos of this project in action, because my camera, the thing I take photos with, is an integral part of the project, but I do have many a CAD drawing, which I think can stand in.
The inspiration for this holster was a camera clip that my grandpa has for his camera. He had a whole vest setup, where it would clip in roughly where a breast pocket should go, and was a really nice way for him to carry said camera. I liked the idea, but didn't want to just spend money on something like that when I could design it myself, and I didn't have access to a vest, so I decided to make it a belt clip.
I originally used a design where the main body and the belt clip part were bolted together, because I had a design for a holster for Nerf magazines that was roughly the same size, so I fully just yanked the clip from that design and then made my own holster around it, which worked pretty well for a while.
Where the bolts interfaced between the holster and the clip parts was a weak point though, and I ended up breaking more than one of those holster pieces just through use, so I decided to redesign the thing.
There's a designer in the custom foam blaster (think Nerf) community that makes some incredible hardware-less blasters. They're still big and mechanically complex, but the way they design the blasters uses friction-fit 3D-printed pins and dovetail joints, which make the blasters so much cheaper and lighter, as well as making replacing parts very easy, and sometimes even tool-less.
I took inspiration from the dove-tail and pin system to design my own, and it worked out really well. The initial design had some issues with a thin spot where the dovetail slotted in, but I moved the slot downwards so it was more in the main body of the holster, and I haven't had any issues with it since!
Below is a timelapse-type thing Fusion will do with designs, where it goes through each step of the current iteration, which is cool. Most of these measurements I was just referencing from the original version, because I changed which CAD program I use, so I don't have access to the original anymore.
Here's a cutaway view of what the inside of the slot looks like:
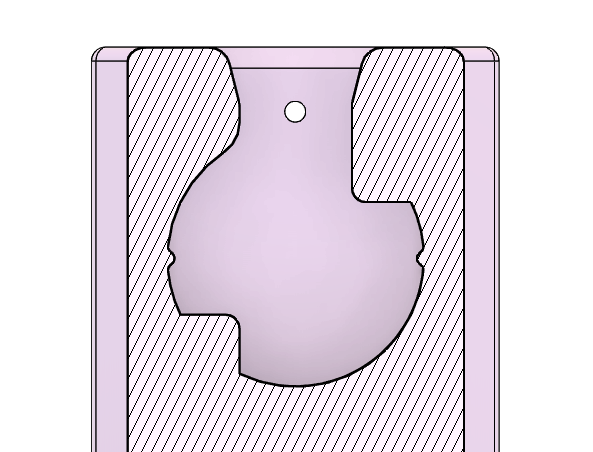
The puck, as I call it, slides in from the top, and then rotates 90 degrees counterclockwise so that it's resting against the flat spots internally, and the two little nubs on the walls fit into divots on the puck, so that it holds nicely in place.
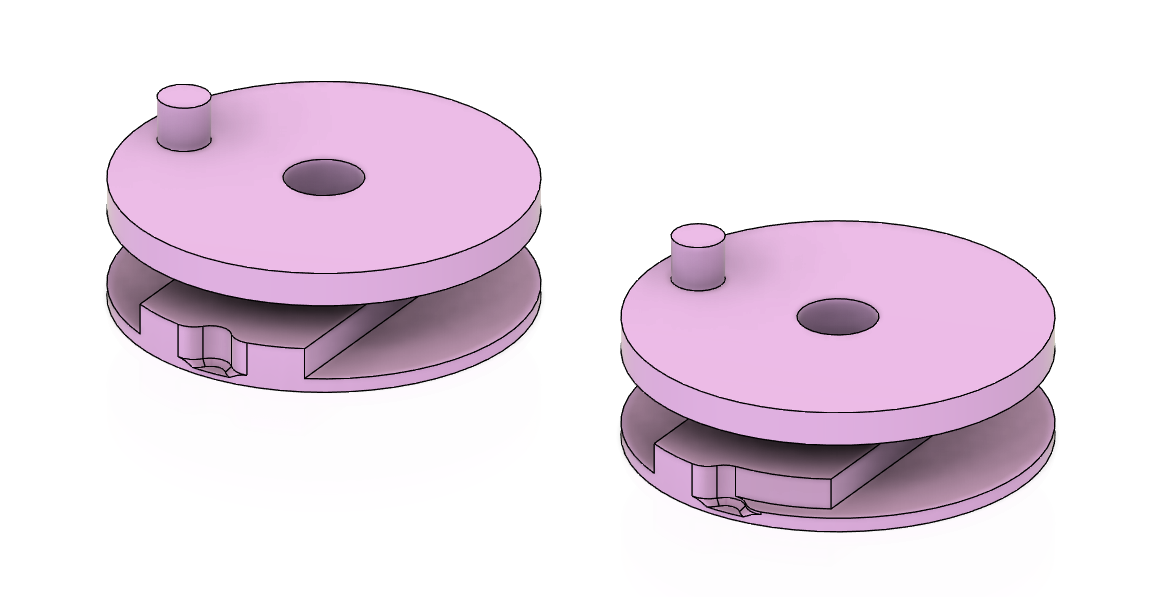
Here is the design of the pucks, the one on the right was designed just in case I didn't want the locking mechanism, or if I had biffed the sizing and the left one wouldn't work, I still had a functional holster. These pucks just bolt into the bottom of the camera with a 1/4-20 bolt into the tripod mount, with the little alignment peg going into the tripod alignment hole, also on the bottom of the camera.
The circular bottom of the puck slides into the slot on the top of the holster, and the top circle slides into the cutout specifically shaped for it; only the rectangular section with the divots interfaces directly with the cutaway view from above. If it weren't for the rectangular section, the camera would just spin infinitely in the slot, but the rectangle, plus the stops and divots, makes it a perfect hold.
The camera slots in at 90 degrees (I wear this holster on my right hip, and am right-handed), so the lens is pointing behind me, and then rotates 90 degrees so that the lens is pointing downwards and the grip is easily accessible by my right hand. I've been using this holster long enough that my muscle memory knows exactly where it sits and how to grab it. Pulling on the grip of the camera is perfectly in line with the motion of the holster, so it comes out almost automatically when you grab it.
Overall, I'm very happy with how this project has turned out, and there aren't any current issues with it, so I don't think I'll need to redesign or reprint it for a while, if ever.